My new STM8S dicovery board

March 12, 2010

My STM 8S 🙂

Thanks to Robotics India . I came to know about an 8 bit microcontroller development board at 7$. I had to cross two hurdles before I purchased this board.

Obstacle 1: My debit card was not processed by paypal to purchase it over e-bay. I was not able to make my payment over e-bay.

Onstacle 2: Farnell India, A re-distributor of the STM-8S boards in India, has a policy of not selling the boards to individual buyers.

I had to ask my friend who owns a company to buy this board for me. I am all set to learn more about this new microcontroller. For more details, ST’s page


The board has been populated and it is ready

February 8, 2010

PICdevelopment board

The board was populated successfully and most of the functional features of the board have turned out to be successful. I am yet to test one of the two voltage comparators available on the board.

The main features of the board include:

  1. PIC16F877A platform
  2. L293D module ( Can drive 2 geared DC motors or 1 stepper motor)
  3. ULN 2003A module for stepper motors
  4. Voltage comparator circuit for LDR based sensor module
  5. Voltage comparator circuit for IR LED – photodiode based sensor modules
  6. Analog Inputs
  7. Seven Segment Display * 4nos
  8. RS232 port
  9. LED outputs to test the comparators/voltage sensors
  10. 8 LEDs to test the outputs of the individual pins of the controller
  11. Plug and play option — Can test it with simple connecting wires across any pin of the microcontroller
  12. Power supply pins to power other add-on boards

Looking foward for your comments!


Functional Features of my development board

February 4, 2010

It had been a long time since the development board was manufactured. I was able to test some of the features of the board. I am done with the H bridge, RS232 communication and the A/D conversion. All were successful.

I realised the importance of input filters only when I blew up the microcontroller by connecting the 12V DC motor to the power supply that is not provided with input filters!

I tried pulse width modulation with my board and I have included  a video that shows the motor running at slow speed in opposite directions.

Interaction of the PIC with the PC using MikroC routines

The MikroC routines for the PIC microcontroller were handy to test my board. In the picture, I was able to send a data to my PIC and echo it back to the PC!

I am yet to program the correct sequence for energising the sequence of the stepper motor coils.


She(Development Board) is ready

January 24, 2010

Finally the board that I had developed is ready. I tested the function of the board with simple PWM program. I provided the output to capture the output using a LED. Though it may not look like a pulse width modulated output, I am happy that the basic functionality of the board is a great success. I believe that the other functionalities are also successful.  I plan to make it open source when the board is fully functional.

I am also enclosing a few photographs of my development board


Building your first development board

November 2, 2009

I had a long chat with one of my friends regarding microcontroller applications and the like.

It never occurred to me that we spend thousands on buying different components for our hobby projects and we discard them after their intended use or construct a different one for another application.

A classical example of using an electronic circuit board on a longer run is your first microcontroller development board.  Be it AVR or a PIC microcontroller, you are going to re-use them for several hobby projects.  Why not develop it as a standard platform?

There are people who sell development boards for PIC and AVR microcontrollers in the market. They provide you with standard interfaces to learn from scratch. For e.g LED Blinking, Seven Segment LED interface, LCD interface, Stepper Motor Driver, Servo Motor Driver etc. One can develop them for himself/herself, step by step.
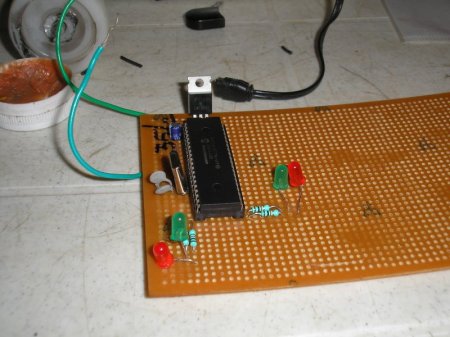
PIC development board

The insert picture shows a PIC 16F877A board developed by me for my hobby projects. It has got the ubiquitous LED interfaced to it. Any hobbyist tests his/her microcontroller board with a standard LED blinking program to start with.

By developing one such board, I learnt interfacing the above mentioned examples. I developed all the standard drivers required for the components, myself. One day, I am planning to bring all the applications together as a product!

Why not try one for yourself?